


Push your forehead a hair toward the camera, extend your chin forward and angle it down just slightly, then shoot from a spot slightly above eye level with a soft key light placed above and angled down. That single combination removes most double chins from a photo before you ever touch an editing tool. This is the exact coaching cue photographers often give clients before using a reflector or a retouching brush.
TL;DR:
- Slightly raising the camera above eye level and zooming in with a focal length of 50mm to 85mm prevents distortion and flatness that exaggerate the double chin.
- Pushing the forehead forward followed by a slight downward tilt of the chin creates a visible separation between the jaw and neck, reducing the appearance of a double chin.
- Soft, downward-angled lighting from above enhances jawline definition by casting a gentle shadow under the chin, especially when using diffusion tools.
- Clothing choices like open necklines and pulled-back hair support the pose and lighting techniques by drawing focus to the jawline and elongating the neck.
- Subtle retouching should complement, not replace, good posing, lighting, and camera angles, with focus on minor enhancements rather than extensive edits.
Table of Contents
- Fixing Double Chin Headshots: Poses That Work in Session
- Camera Angle and Focal Length: Why Shooting Above Eye Level Matters
- Lighting Setups That Create a Slimming Chin Shadow
- What to Wear and How to Style Hair for a Stronger Jawline
- Camera Settings and Lenses That Keep Headshots Sharp and Natural
- When Retouching Makes Sense, and Where to Draw the Line
- Professional headshot sessions are often designed to address jaw and neck concerns before the shutter clicks. Sessions may open with a consultation to discuss specific concerns, including double chin, to tailor coaching plans. Live posing coaching can guide clients through facial cues in real time, paired with adjustments in camera height and key light placement suited to face shape. Clients might see previews on the back of the camera during the session, making instructions visible and easy to coach within a few shots.
- Makeup Techniques to Contour and Soften a Double Chin
- Facial Exercises and Stretches That May Help Over Time
- Scarves, Collars, and Other Props That Camouflage a Double Chin
- What Actually Moves the Needle on Double-Chin Photos
- Book a Session With Metroplex Headshots and Skip the Guesswork
- Where This Guide’s Techniques Come From
- Sources
- FAQ
Fixing Double Chin Headshots: Poses That Work in Session
The mechanical goal behind every double-chin fix is simple: create visible separation between the jaw and the neck. Skin that sits flat against the neck reads as a double chin on camera, even on people who don’t have one in person. Stretch that skin forward and down, even by a fraction of an inch, and the shadow line under the jaw sharpens immediately.
Three coaching cues get you there, and each solves a slightly different problem.
- The turtle. Push the forehead forward first, then let the chin follow down and slightly forward. Coaching it as “lead with your forehead” works better than saying “stick your chin out,” because most people tense their neck when told to move their chin directly.
- The peach hold. Widely taught in portrait coaching, this cue asks the subject to imagine holding a peach under their chin without touching it, which naturally elongates the neck and pulls the jawline forward. It’s especially effective for clients who feel stiff or self-conscious about “posing.”
- The forehead push. For subjects who round their shoulders or duck their head during the chin forward and slightly down adjustment, cueing a forward forehead push corrects posture and jaw definition at the same time.
The most common mistake I see is subjects moving too much: they thrust the chin forward like they’re diving into a pool, which looks strained on camera. The fix is tiny. Micro-adjustments of a small forward movement and a slight downward tilt are usually enough. A second common error is dropping the eyes when the chin moves, which kills presence in the shot. Keep the eyes level and locked on the lens.
Pro Tip: Practice this in a mirror or phone camera before your session. Take a shot straight on, then push your forehead forward and tilt your chin down slightly, and take another. The difference usually shows up in under a minute, which is exactly why this cue works so well live.
Camera Angle and Focal Length: Why Shooting Above Eye Level Matters
A camera positioned slightly above eye level compresses the chin area and elongates the face, and it’s one of the most consistently flattering setups in portrait photography. Shooting from below does the opposite: it widens the jaw and pushes the chin area forward into the frame, which is why phone selfies taken at chest height so often produce an unwanted double chin. The above-eye angle also draws attention up toward the eyes, which reads as more confident and engaged.
Focal length matters just as much as height. A 50mm to 85mm range (or its equivalent zoom on a phone) keeps facial proportions natural. Wider lenses distort features up close, exaggerating the chin and jaw the closer the camera gets.
- Do: raise the camera or phone slightly above eye level and tilt it down a touch toward the subject.
- Do: back up and zoom in slightly rather than shooting close with a wide lens.
- Don’t: prop a phone flat on a table pointed upward, which is the single most common cause of accidental double-chin selfies.
- Don’t: shoot from a low tripod height meant for a taller subject without adjusting it first.
Lighting Setups That Create a Slimming Chin Shadow
Light does as much work as posing when it comes to jaw definition. Raising the key light slightly higher than eye level and angling it down toward the subject creates a soft shadow directly under the chin, which visually separates jaw from neck without looking artificial.
The setup only works if the shadow stays soft. A bare light source above the head creates a harsh line that looks worse than the double chin itself.
- Use a softbox or diffusion panel on the key light to keep the shadow gradual rather than sharp.
- Keep fill light low enough that the under-chin shadow survives; too much fill erases the effect entirely.
- Add a hair or rim light behind the subject to separate them from the background, which reinforces the jawline visually.
- For phone or window-light setups at home, position the subject facing a window with the light source slightly above their eye line, not directly across from it.
Pro Tip: If you’re shooting near a window for a quick phone headshot, tilt your chin down just slightly toward the light source rather than away from it. The shadow that forms under the jaw does most of the work the studio softbox would otherwise handle.
What to Wear and How to Style Hair for a Stronger Jawline
Clothing and hair choices either support or undercut everything the pose and lighting are doing. A V-neck or open collar elongates the neck and keeps attention on the jawline, while turtlenecks and very high collars add visual width right where you don’t want it.
- Choose open necklines over turtlenecks or tight, high collars.
- Keep hair pulled back or tucked behind the ears so it doesn’t rest against the jaw and blur its line.
- Skip heavy statement necklaces that sit at the base of the neck, since they draw the eye downward and widen that area.
- A light dusting of matte powder along the jaw and under the chin cuts shine that can flatten the shadow work your lighting is doing.
Camera Settings and Lenses That Keep Headshots Sharp and Natural
Technical settings need to support the flattering angle, not fight it. An aperture around f/2.8 to f/5.6 usually gives enough background separation while keeping the whole face sharp, depending on your lens and distance from the subject.
- Stick to a 50mm to 85mm focal length to avoid the distortion that wider lenses introduce at close range.
- In studio light, a shutter speed around 1/125 with ISO 100 to 200 keeps images clean without motion blur.
- Near a window, raise ISO to 400 or 800 as needed rather than dropping shutter speed low enough to risk blur from hand or head movement.
When Retouching Makes Sense, and Where to Draw the Line
Retouching is a finishing step, not a fix for a pose or lighting setup that never got the shot right in the first place. Fixing the source almost always looks better than fixing the file, and it takes less editing time either way. Some how-to sources note that light dodge and burn or a subtle liquify pass can smooth out what pose and lighting didn’t fully catch, but retouching should never be the primary strategy.
- Light dodge and burn along the jawline can deepen a shadow that’s almost there but not quite defined.
- A minor liquify adjustment can soften a stray fold of skin, but pushing it too far distorts proportions and looks obviously edited.
- Selective sharpening on the eyes and smoothing on the neck area balances attention across the frame instead of over-processing one spot.
Keep every adjustment subtle enough that a friend looking at the final image wouldn’t be able to point to what changed.
Professional headshot sessions are often designed to address jaw and neck concerns before the shutter clicks. Sessions may open with a consultation to discuss specific concerns, including double chin, to tailor coaching plans. Live posing coaching can guide clients through facial cues in real time, paired with adjustments in camera height and key light placement suited to face shape. Clients might see previews on the back of the camera during the session, making instructions visible and easy to coach within a few shots.
Most viewers remember a headshot’s presence and energy far more than any minor detail a client fixates on in the mirror. Clients almost always over-focus on the one thing pose and light were built to solve.
Retouching comes last, and only where pose and light left something small on the table.
Makeup Techniques to Contour and Soften a Double Chin
Makeup won’t replace good posing or lighting, but it sharpens the effect they create. Contouring works by exploiting the same shadow logic as studio lighting: a matte bronzer or contour shade applied just under the jawline, blended down toward the neck, deepens the natural shadow the key light is already forming.
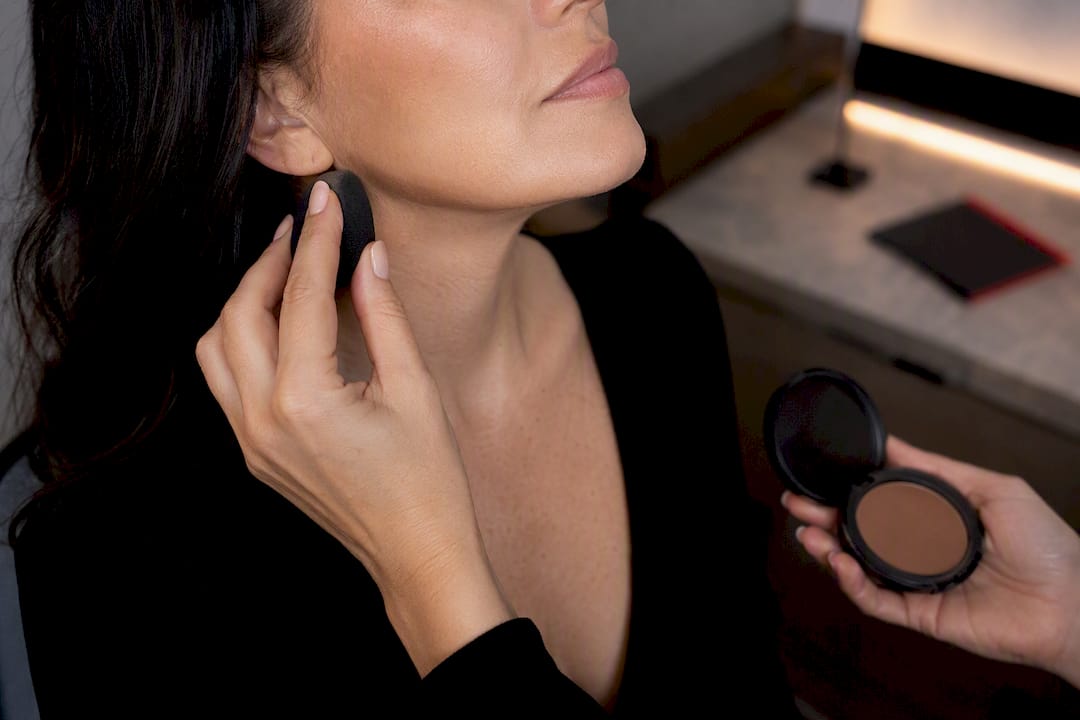
The trick is restraint. A contour shade one or two tones darker than the natural skin tone, swept along the underside of the jaw and blended so there’s no visible line, reinforces definition without looking like stage makeup under camera lighting. Adding a lighter highlight shade just above the jawline, along the cheekbone and center of the chin, pulls the eye upward and away from the neck.
Matte finishes matter more here than almost anywhere else on the face. Shine on the neck and under the chin catches studio light and flattens the very shadow that pose and lighting worked to create, so a light dusting of translucent powder in that area locks the contour in place through a full session.
Cream contour products tend to blend more naturally than powder for this specific area, since powder can settle into fine lines along the neck and draw attention rather than deflect it. Blending with a damp sponge rather than a dry brush keeps the transition soft enough to survive close-up retouching review. For clients unfamiliar with contouring, a light hand is the safest starting point. It’s far easier to add a touch more product between shots than to correct an overdone line once the camera has already caught it.
Facial Exercises and Stretches That May Help Over Time
Posing and lighting solve how a double chin looks in a single photo, but some clients ask about reducing it more permanently. Facial exercises and neck stretches are a lower-stakes, gradual option worth mentioning, though results vary from person to person and depend heavily on factors like age, skin elasticity, and how much of the appearance comes from muscle tone versus fat or skin laxity.
Simple stretches like tilting the head back and looking at the ceiling, then pursing the lips as if kissing the sky, target the platysma muscle that runs along the front of the neck. Holding that position for several seconds and repeating it a handful of times a day is a common recommendation in general wellness guidance, though it works slowly if it works at all.
Chin lifts, where the head tilts back and the lower lip pushes up and forward, are another frequently mentioned stretch aimed at firming the same muscle group. Neck rolls and jaw clenches show up in similar routines, though none of these should be treated as a guaranteed fix.
It’s worth setting expectations honestly: exercises may firm underlying muscle over weeks or months, but they won’t change skin laxity or fat distribution the way posing and lighting change a photo instantly. For anyone photographing a headshot next week, camera and light do the real work. For anyone thinking months ahead, gentle daily stretching is a reasonable, low-risk habit to add alongside them, not instead of them.
Scarves, Collars, and Other Props That Camouflage a Double Chin
Props and clothing choices can do quiet, effective work when pose and lighting alone don’t fully solve the shot, particularly for on-location or headshots taken outside a controlled studio setup. A scarf draped loosely around the neck, rather than wrapped tightly, breaks up the visual line where jaw meets neck and gives the eye something else to focus on.
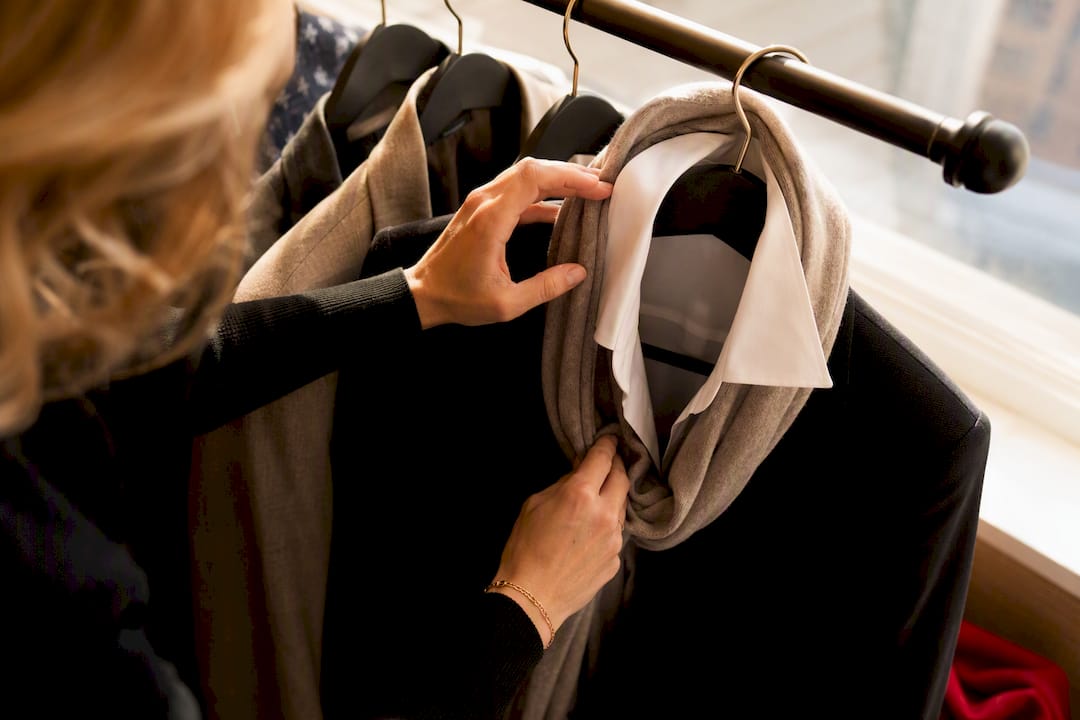
Structured collars work the same way a scarf does, but with more precision. A collared shirt worn open, with the collar sitting slightly away from the neck rather than tight against it, creates a visual gap that keeps the neckline from reading as one solid mass. Blazers and jackets with a defined lapel pull the eye outward and up toward the shoulders and face, away from the chin.
Jewelry can help or hurt depending on placement. A single statement necklace that sits low, below the collarbone, draws focus away from the jaw entirely. A choker or tight necklace sitting right at the base of the neck does the opposite, adding a visual line exactly where the pose and lighting are trying to create separation.
For clients preparing wardrobe ahead of a session, checking what to wear and how to prep in advance avoids last-minute scrambling. Home studio setups also benefit from thinking through what’s visible behind the subject, since a cluttered or distracting background pulls as much attention as a bad prop choice. Readers preparing a home office or video-call backdrop can find useful framing ideas in advice on styling backgrounds for video that applies just as well to a headshot setup.
What Actually Moves the Needle on Double-Chin Photos
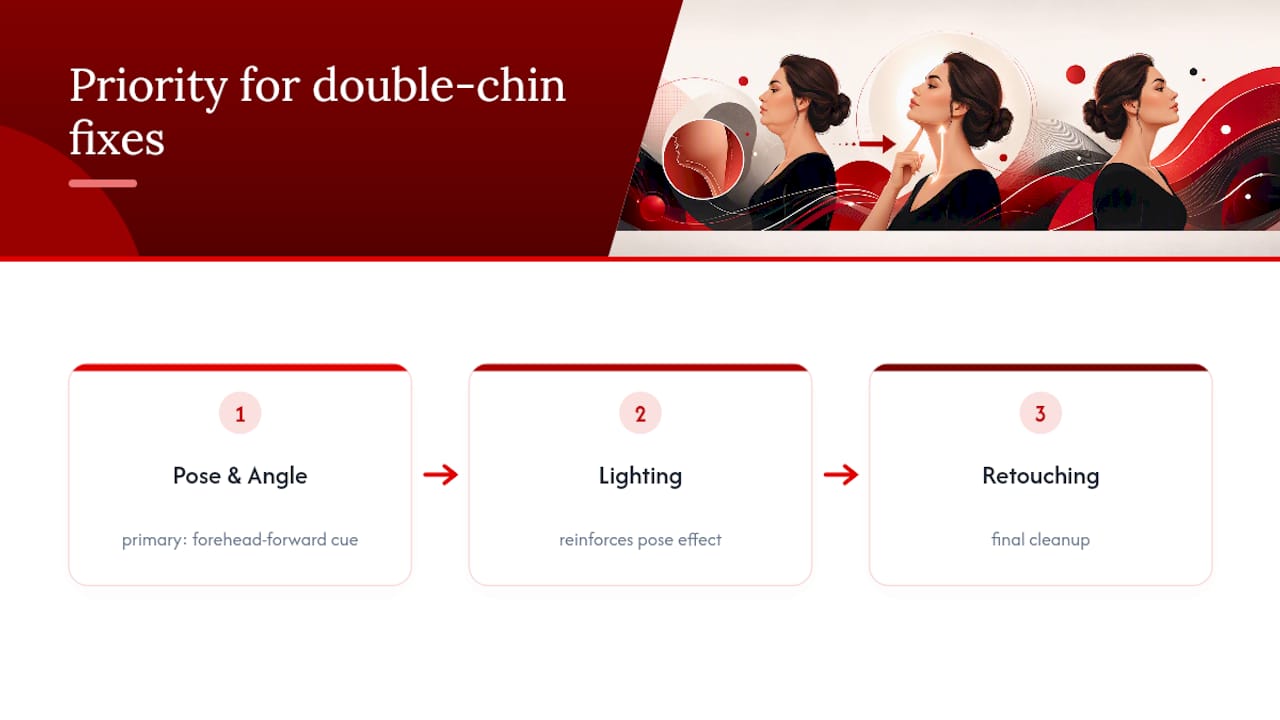
Most advice on this topic treats posing, lighting, and retouching as three separate fixes people should try in sequence. That’s backwards. Pose and camera angle do roughly all the work; lighting reinforces it; retouching cleans up whatever fraction remains. Treating retouching as step one, which is what a lot of people do when they open an editing app first, means fighting against a flat, unflattering photo instead of preventing one.
The most overrated piece of common advice is telling someone to simply “tilt their head.” Head tilts change the angle of the face relative to the camera, but they don’t create the forward-and-down chin movement that actually separates jaw from neck. That distinction gets lost in a lot of quick-tip listicles.
If you’re preparing for a headshot yourself, prioritize the forehead-forward cue and camera height first, above anything else. Everything else, wardrobe, makeup, light modifiers, works better once that foundation is right, and none of it can fully compensate if it’s wrong.
— Traci Schowmeyer
Book a Session With Metroplex Headshots and Skip the Guesswork
Reading about the forehead-forward cue is one thing. Having someone watch your face in real time, adjust the camera height a few inches, and show you the difference on the back screen is another. Metroplex Headshots builds every session around that live feedback loop, whether you’re booking an in-studio appointment or bringing the mobile setup to your office for a team of executives.

A typical session includes posing coaching tailored to your face shape, a choice of in-studio or on-location shooting, fast image delivery, and professional retouching once the pose and lighting have already done most of the work. Bring two or three outfit options with open necklines, arrive with hair styled off the jawline, and the rest gets handled during the consultation and shoot itself. If you want to see the range of looks a session can produce before booking, the gallery of headshot styles is a good place to start, and it’s also where you’ll find current booking details for the Dallas-Fort Worth area.
Where This Guide’s Techniques Come From
- Flattering photos: portraits — DailyPhotoTips
- How to Avoid Double Chins in Portrait Photography — PictureCorrect
- 5 simple ways to reduce double chin when shooting portraits — PetaPixel
- Headshot poses for business professionals — Tov Studio Photo
Sources
- Flattering photos: portraits — DailyPhotoTips
- How to Avoid Double Chins in Portrait Photography — PictureCorrect
- 5 simple ways to reduce double chin when shooting portraits — PetaPixel
- Headshot poses for business professionals — Tov Studio Photo
FAQ
Why Do I Still Have a Double Chin After Losing Weight?
A double chin in photos often comes from posture and camera angle, not just body fat, so weight loss alone doesn’t always eliminate it from pictures even when it’s less noticeable in person.
Why Do I Always Look Like I Have a Double Chin in Pictures?
Most cameras, especially phones held at chest height or below, shoot from an angle that widens the jaw and flattens the neck, which creates or exaggerates a double chin that isn’t as visible face to face.
Is Having a Double Chin Unattractive?
A double chin is simply a common feature of many faces, and this guide focuses on flattering photography techniques, not on framing the feature itself as a problem to fix in daily life.
Can You Edit a Double Chin Out of a Photo?
Light retouching like dodge and burn or a subtle liquify adjustment can reduce a double chin’s appearance after the fact, but photographers generally treat editing as a finishing touch after pose, angle, and lighting have already done most of the work.

